考虑到在 Linux 系统中可以更方便进行开发环境的搭建,而自己常用的操作系统又是 Windows,因此在 Windows 10 中开启 Linux 子系统 (WSL) 使用是一个很好的折中选择。
启用 WSL,安装 Ubuntu
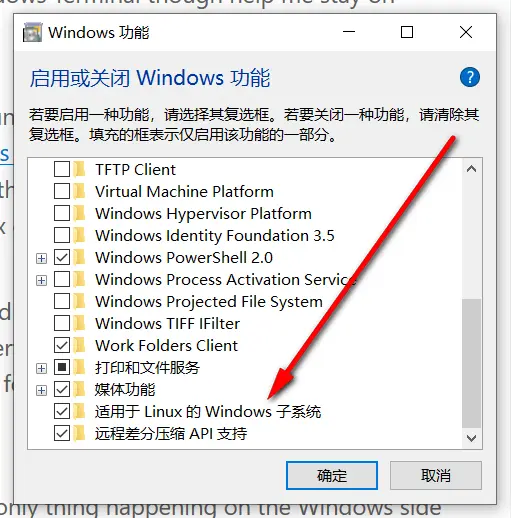
在 Windows 10 中,打开控制面板 - 卸载程序 - 启用或关闭 Windows 功能,选择开启适用于 Linux 的 Windows 子系统。
打开 Microsoft Store 搜索 Linux,安装任意 Linux 系统,建议安装 Ubuntu 18.04 LTS。安装完成后,点击启动即可成功开启系统。
WSL 子系统的基础配置
开启登陆后首先设置用户名和密码。
替换软件源:
Ubuntu 的软件源配置文件是 /etc/apt/sources.list。将系统自带的该文件做个备份,将该文件替换为下面内容,即可使用阿里云的软件源镜像。
deb http://mirrors.aliyun.com/ubuntu/ bionic main restricted universe multiverse
deb-src http://mirrors.aliyun.com/ubuntu/ bionic main restricted universe multiverse

deb http://mirrors.aliyun.com/ubuntu/ bionic-security main restricted universe multiverse
deb-src http://mirrors.aliyun.com/ubuntu/ bionic-security main restricted universe multiverse

deb http://mirrors.aliyun.com/ubuntu/ bionic-updates main restricted universe multiverse
deb-src http://mirrors.aliyun.com/ubuntu/ bionic-updates main restricted universe multiverse

deb http://mirrors.aliyun.com/ubuntu/ bionic-proposed main restricted universe multiverse
deb-src http://mirrors.aliyun.com/ubuntu/ bionic-proposed main restricted universe multiverse

deb http://mirrors.aliyun.com/ubuntu/ bionic-backports main restricted universe multiverse
deb-src http://mirrors.aliyun.com/ubuntu/ bionic-backports main restricted universe multiverse
配置使用 xshell 连接 WSL:
成功启用 WSL 后,默认的命令终端比较难用,所以配置使用 xshell 来连接 WSL。
// 卸载 SSH, --purge 指明这个包应该被完全清除
sudo apt-get remove openssh-server

// 重新安装
sudo apt-get install openssh-server

// 重启 ssh 服务
sudo service ssh --full-restart
之后即可通过 xshell 连接 WSL 了。